Saturday, March 24, 2012

Steampunk Pirate: Accessories

Sometimes a costume doesn't really come to life until we add those last, little touches. For this costume I had a host of accessories in mind but limited time to pull them together. Rather than driving myself mad with several sleepless nights, I decided to experiment with limiting myself to just a few touches and prioritizing them.

I started with a sheath for my wooden sword. I wanted to have some sort of weapon and in my personal conception, pirates riding around on dirigibles would not use a great many fiery, projectile like weapons. Growing up with a grandfather who was part of the the early aviation scene in the U.S, I heard his retelling of Hindeburg fire that I can imagine only disastrous consequences to fire on a dirigible. So. A sword simulacrum for me!

The sword had the added advantage of being already on hand. I studied Tai Chi sword for a number of years so I could simple pull out my wooden practice sword and work up a sheath to coordinate with my ensemble. I pulled out some brown felt, and using the sword body for my template, I sketched out a pattern onto the fabric. I tried to account for the curve of the sword body by sketching in some extra room before the curve in the blade.

Once I had my pieces cut, I took what I planned to be the visible side of the sheath and sketched a design onto it for some more gold-work to match what I had done on my corset. I kept the pattern simple though I was tempted to go hog wild. By this point, I was becoming a pro at couching on the gold cord. I cut two short lengths of felt which I wrapped over the bottom of D-rings so that I could hang the sheath from my corset or a belt and then basted these hangers into the seam allowance. I then sewed up the side seams and voila, I had a sheath. (All of my guy friends who have done some sort of historical re-enactment with swords assured me that my sheath was entirely impractical and inaccurate, by the by, but it certainly has flair!)

Next step was a shirt. I wanted to make up something with big puffy sleeves but knew that I didn't have time for another garment from scratch. However, I did have a nice, scoop necked t-shirt in white that had a splendid grease stain down the front that never came out. I decided that I could tea dye the shirt and that the grease stain would be quite hidden by the body of the corset.

Tea dying is fun and simple! How often do we get to boil our clothes on the stove? It turns out that the kind of tea one uses can affect the color of the dye bath so I tend to use plain old Lypton's ice tea for my dye bath. It has the advantage of being cheap, coming in large quantities and providing a decent brownish color. It antiques whites very nicely. I typically take two bags of the tea, tie them to the handle of a large pot, fill said pot with water, and boil away! Once the water has boiled and the tea has steeped for a wee bit, I throw in the fabric. I tend to turn the heat off at this point and then stir like mad. (Note: make sure to pre-wash before dyeing fabric or clothes. It removes any chemicals or grease and dirt from wear.)

While I was dying my little shirt, some kind soul started ringing my door bell. Once I had explained, politely, that I was not in fact interested in the product they were selling, and returned to my shirt, I was afraid I had allowed it to steep too long. It was rather darker than I had planned. I threw it into the wash and thankfully, it turned into fairly nice creamy color. For the most part. The results of stepping away from my stirring was that my shirt came out very streaky. Generally not a desirable result, this streakiness was perfect for a pirate living her life around smoke, dust, and grease on a dirigible. In other words, the shirt looked lived in. I loved it. Also, the grease stain on the front was entirely obscured by the tea dye. Sometimes serendipity is awesome.

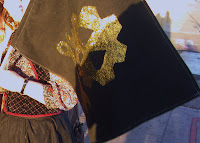
So now I had a shirt and a sword to go with the pants, corset, spats and hat. What more could a lady ask for? Well... a flag of course! My husband stepped in at this point and gallantly assisted me. I had started drafting out a skull and crossbones that hinted at the Steampunk genre. (I was amusing myself mightily by trying out different goggles on my skull when my husband found me.) Dear readers, he rescued you all from my strange humor and provided a wonderful skull and cross bones stencil which he then applied to the flag fabric. I can take credit only for stitching up the raw edges and attaching the flag to a little wooden pole. The true brilliance was all my husband's. I felt quite piratical waving around my flag.

To finish things off, I added a few ready-made accessories. I have a lovely pair of mitts from Clockwork Couture that were a gift. I also pulled out a wonderful necklace that I had picked up earlier at a local shop, Silver Sea Jewelry. I love this place not only because it is local and the prices are amazingly good, but also because it is the business of a dear friend. It is my only piece of jewelry with obvious gears, and I love that they move and mesh. I topped everything off with a flamboyant pair of earrings from the local UNICEF store. Big, brass, and jangly: they were a special find at the shop many years ago, and as I recall, they arrived in Tucson from parts unknown in India.

Last but not least was the bag. Originally, I had planned to make a little pouch that I could hang off a belt or from the bottom of my corset so that my arms and hands would be mostly free. A purse simply did not feel quite right with a piratical ensemble. However, time evaporated very quickly under the weight of all that gold work embellishment. I pulled out a bag I made last year. I am quite fond of my reticule of smashing, as I like to call it, and think it suits the ensemble reasonably well even though it is not the most practical of things for a pirate to carry.

Having fun with a wonderful friend or two or three is, of course, the very best way to finish a costume. I am glad to say that I could debute my Steampunk Pirate ensemble by going out on the town with my best girlfriend who wasn't an accessory at all... unless you think in the legal sense. She certainly was willing to get up to any and all hijinks with me. She even incited a few of her own! I won't speak for her experience making a costume but I will say that she looked positively stunning. She turned more than a few heads as we paraded around in downtown Tucson, bringing our own brand of pirate tomfoolery with us. I would not have enjoyed my costume half so much or had even a fraction of the fun without her there to wave our flag, accost strangers and general behave as the amazing woman she is. What a delightful end to a fun project!


~La Cucitrice

Wednesday, March 21, 2012

Steampunk Pirate: The Spats Gaiters

Good boots that fit comfortably and flatter are something of the holy grail for me. Someday, I tell myself, there will be boots worthy of the investment. Then I remember I live in the desert. While I lust after proper leather boots, I realize they are not perhaps the most practical footwear for much of our year.

For the Steampunk pirate ensemble, I decided to try a compromise. My piratical pants most assuredly needed something akin to boots so that they would present the proper piratical puffiness. I thought that the pants provided the perfect opportunity to try out a pattern for spats gaiters. (Quite oblivious to proper naming conventions, I spent a great deal of time referring to the poor things as spats. However, I have since learned that anything so tall clearly falls into the gaiters category.)

I began my adventures in gaiter making with a mock-up. If there is something I have learned over the years, it's that skipping the mock-up portion of a project is not always a good way to save time. Some garments, especially those I have made before, require no such preparation, but something as fitted and out of my experience as these gaiters certainly required some groundwork. After careful measurements of my calves and ankles, I adjusted the pattern pieces and I cut out the pattern--our much used and much loved Laughing Moon Sporting Costume once more provided the pattern-- in a similar fabric to what I intended to use for the final product. I sewed them up and give them a whirl for a fitting. The good news: they were humongous so I had plenty of room to alter them down. The bad news: the shape was becoming a little odd.

At this point, I made a grave error in judgement. Rather than calling in a second pair of hands to help me pin and adjust the mock-up, I pinned and adjusted myself while bent over at the waist and twisted around to blindly stab pins at my calves the fabric. Oh hubris! I was certain that I had adjust them sufficiently to get a good fit. This is often how I learn my best lessons in sewing.

I sewed up one leg of the adjusted gaiters and tried it on. It was properly snug in some places and strangely baggy in others. There was this "charming" pocket of pure empty space that stuck out over my calf. I don't believe the word flattering entered into the description, but there was certainly some colorful language in my workshop. Again I attacked the problem with pins, adjusted the baggy spots, tried to adjust the area with the pocket, made the same adjustments to the other let's pieces and sewed it up again. A quick fit seemed to suggest that the gaiters fit well enough. I sewed up the other leg.

I was concerned enough about keeping the legs of the gaiters upright rather than bagging up around my ankles that I tacked horsehair braid to each seam and covered the braid with grosgrain ribbon so that the prickly bits of plastic would not irritate my skin. I then bag lined the whole thing in natural cotton muslin for added comfort. I suspect that I would still find cloth gaiters rather warm in the desert and I wanted something that breaths while also protecting my skin from any weird seam friction. After all, these gaiters were supposed to fit snugly. They might rub oddly while I walked. I couched gold cord over the seems on the outside to give a little visual pop and also to hold the fabric, horsehair braid, & lining sandwich together.

Satisfied with the interior construction. I added the button holes and buttons. (A little out of order in construction terms but I needed to make sure I had enough buttons in the house while the fabric shop was still open.) Once the buttons were in place, I used some bias trim I had in the house. This was a bias tape I had made for a costume last year. Due to a failure in my math at the time, I have yards and yards more than I needed for that costume. It has, however, come in handy on many occasions so it has a costuming happy ending after all. Since I was running short on time at this point, I cut some corners on the bias tape and sewed it all down by machine rather than doing one side by hand.

I had long ago thrown out the pattern instructions at this point so I wasn't paying any attention to details like where I should attach the elastic to go under my shoe. I simply tacked it down where it seemed appropriate given the shape at the bottom of each gaiter. Note to self: do not attach the elastic so that it is on the back half of the side opening. Putting them on required me to step backwards into the gaiters and do a little heel shimmy over the elastic.

Ultimately, though they were fit to wear for our little piratical outing, I was somewhat unhappy with my execution of this pattern. Despite my efforts, the gaiters continued to be too large in some key areas around my calves and at my ankles. My husband offered to stuff the baggy spots but the effect was oddly Henry the VIII-- not the look I was going for despite the fact that I share ginger hair with old Henry. I was right to worry about the bagging issue as well because the gaiters did slide down and bag around my ankles. I chose to think of them as piratically casual but I found the bagging slightly uncomfortable. Fortunately, the lining did its job admirably. Neither seam nor horsehair braid caused any odd chaffing. They will, however, return to the work table for some modification.

~La Cucitrice

Friday, February 24, 2012

Steampunk Pirate: The Corset

As I mentioned a little while ago, there is a pirate parade on the horizon here in Tucson--something I absolutely cannot resist. I started making plans for a pirate costume almost immediately, but those plans were a bit amorphous at first. There were the obvious things, well, thing. (Well, alright, I did it for the hat.) But beyond that, the world was, literally, my playground.

Serendi
pity, that unpredictable but charming beast, was at work, however. There is a blog that I follow-- Multiculturalism for Steampunk -- and the charming writer of that work has initiated a challenge which I found very inspiring. Since this week's challenge is the Airship Pirate, I think Serendipity has been working over time. Her challenge caused my mind to travel down the various pathways of interest and occupation in my life until I settled on the Balkans and the Ottoman Empire for my particular sources of inspiration.

Fortunately for me,
because I spend every Monday night singing the folk music of that area with the ensemble, Mzekala, I already have a great fondness for and familiarity with the Balkans. In my capacity as blog writer for Mzekala, I have already done a fair bit of research on the costumes, cultures and traditions of the Balkans. This gave me a good start on ideas for the costume, and I decided I would give my corset a little Balkan flair.

Earlier I mentioned the Ottoman Empire, and it was most certainly on my mind. During the 19th century, nationalism was on the rise all over Europe and nowhere more so than in the Balkans which were then a part of the Ottoman Empire. The Ottoman Empire was a quite the melting pot, and in some parts, it was extremely cosmopolitan. Cultural elements spread across the empire, in particular elements of fashion and ornamentation-- the fez, for instance, or the wonderful gold-work embellishments found on many garments.

That Ottom
an presence in the Balkans gave rise to the very class of people I wanted to represent for the pirate parade: hajduks or, as I saw them called someplace, land pirates. Outlaws, rebels, heroes--these men were as diverse and hard to pin down as the Balkans themselves. They were, without doubt, deeply important to the independence movements across the Balkans, and they were most certainly the kind of colorful, romanticized figures in folk culture that pirates have become in modern popular culture. In the hajduks, I saw an opportunity to re-imagine an airship pirate who could be a heroine as well as a rogue.

Now that I had an idea for what I was doing with the corset, it was time to
start the sewing. Well, the fun sewing. I had already tracked down, mocked-up and fitted a pattern but now I could have fun giving it that Ottoman Empire era Balkan flair. I knew I wanted to do some gold-worked arabesques on the outer fabric and hoped that I could find some pre-drafted embroidery patterns to work with. I had very little luck in this regard so I ultimately stole borrowed an embroidery design from some Turkish trousers. Thank you, Max Tilke.

Initially, I had a demented plan to make part of the embellish
ment look like meshing cogs and gears. I thought it would be a nicely subtle nod to steampunk. Hah. It was so subtle that they shall forever be remembered as sunbursts, not gears. Our little secret, dear readers, the "rays" mesh just like gears. Well, a costume piece is always improved by a little humor.

Once I had
the design, it was merely a question of endurance as I couched 12 yards of gold cord across the outer surface of the corset. (A great deal of tea and many Dr. Who episodes were sacrificed for this part of the project.) Later, I'll write up the actual making of the corset but today, I wanted to feature the design elements and the inspiration process.

If you are curious about the Balkans and th
e Ottoman Empire, let me suggest some further reading.

Bai Ganyo: luckily for us, this book wa
s recently translated into English. It's an excellent translation and a wonderful look at 19th Century Bulgaria culture. You can read my discussion of it here.

Black Lambs and Grey Falcons
: a collection about 19th century women travelers in the Balkans, not the famous and similarly titled Black Lamb and Grey Falcon, which is also a good read.

Oriental Panorama: British Travellers in 19th Century Turkey: a book I perused while learning about hajduks. I found a copy to read in part here.

Imagined Communities: an incredible work on Nationalism and a must read for anyone interested in that topic.

And finally, here is a nice history overview of Ottoman Empire as it began to fail.

The history of both the Balkans and the Ottoman Empire is so immense that no list, especially one so short, can ever be complete, but these are a few nice places to start.

~La Cucitrice


Link

Tuesday, February 14, 2012

Steampunk Pirate: Three Hour Zouave Hat


After looking through a number of pictures of Zouave Vivandiere and Zouave troops, I was slightly obsessed with the soft hat I kept seeing. There were quite the array of hats that Zouaves wore--everything from fezes to kepis. The soft cap with tassel, however, really caught my imagination, and so I decided I would make one for my upcoming pirate costume. (Click on the image for a link to a nice blog about Victorian era military units and the Zouave Vivandieres in particular.)

While I could
not find an image that gave me a really good view of the construction of that soft cap, I thought I had a general enough idea of its shape to make my own. It reminded me a bit of the cap worn by the Greek Evzones. I was able to see a little more detail on some of those caps so that informed my design decisions in part. Once I had staked out my mental image of the design, I spent about three hours putting the hat together. It was a fun and easy project.

There are a few things I might change for a future version, but overall, I am quite happy with my little hat. Since that's the case, I am going to share a step by step look at how I put this together so my dear readers can make their own little cloth cap if the desire ever arises.

I started by hitting my fabric stash
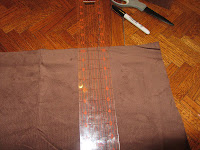
for some scraps that were the right color and weight for a soft fabric cap. I picked the same fine wale corduroy that I used for a pillbox hat not too long ago. I measured out a sizable rectangle of fabric-- the circumference of my head with a little ease plus 1 inch for seam allowance and 10 1/2 inches for the height. I tracked down some linen-cotton blend fabric in the same pile of scraps to be the lining and cut it to match the outer fabric.

I sewed each rectangle along the short side to make a tube. This would be the body of the hat and lining. I used a 1/2 inch seam allowance which is not quite standard but I find it is easier to measure consistently than 5/8 inch when I am putting together something quick like this. Once I had the seams done, I pressed them open.

I matched t
he two tubes, right sides together, along the seams, and pinned around the bottom edge. I sewed this together and then pressed the seam allowance toward the corduroy. I also folded over and pressed a half inch around the two remaining raw edges of the fabric tube. All of the machine stitching was done and it was time to sit down to do a little hand sewing.


I decided I would gather the linen-cotton fabric and then simply pleat the outer corduroy fabric. I us
ed a dark-brown matching thread to do the pleating and ran my stitch through the crease of the pressed fold on the lining fabric so that it would be invisible once I was done. I pulled the gathers closed and ran a few quick stitches across the small hole to tie everything together. Large gathers worked best so this portion went by quickly.

Pleating the outer fabric was a little trickier. It took me a few tries to get a feel for how wide I wanted t
he pleats to be and what angle they needed to follow in order to make a nice circular shape. I made a solid stitch through each corner of the pleat to tack it into place as I went. When I got to my last pleat or two, I sewed in the tassel with a few solid whip-stitches which I then concealed under the final pleats. Once the pleats were in place, I took a few last stitches across the small hole to tie everything together as I did with the lining, tied it all off with a French knot and then covered the opening with a button in my stash.

The final test was putting it on to see how it fit my face and how it draped. It fit reasonably well. In future, I plan to add an extra 1/2 inch for more ease around my hair and more length to the short seam so that it drapes a little more dramatically. Also a note of warning, check the tassel length. Mine is a little on the dangerous side length-wise as it can swing right into my nose and mouth while I'm walking. A little longer tassel would certainly avoid that issue. Fortunately for me, I've never balked at a little tassel to the nose.

~La Cucitrice

Sunday, February 12, 2012

Steampunk Pirate: Turkish Trouser Madness

These trousers are perhaps my favorite recent project. They went together amazingly quickly and turned out to be extremely comfortable. Indeed, I find myself wondering if it is entirely seemly for them to be so terribly comfortable. Initially, I had intended to find a boldly striped cotton fabric, perhaps in a red. I rather thought red stripes would be a smashing look for a piratical costume and also thought I might be able to wear the red with the sporting jacket I made last month.

However, during my journeys to the various fabric pushers vendors in town, I found that none of the offerings appealed to me. I returned to my trusty stash where I discovered this delightful striped brown linen. I had been saving it for a different project entirely but decided it would be perfect for piratical Turkish trousers. Moreover, I had it on hand with enough to make up the trousers. Clearly, the costume muse was busily at work!

The hard part of the project came next. I needed to pre-shrink and iron the fabric and then cut it out. Usually, this part of a project is merely tedious, though necessary, but because of the sheer volume of fabric needed for the rather flamboyantly full trousers, there was a great deal to iron. A very great deal. I believe at one point I may have begun to mutter vehemently against the wrinkly qualities of linen. Fortunately, pirates do not feel a need to iron their trousers on a regular basis so once made up into a garment, these trousers will likely never see an iron again. (At least, I assure you, gentle readers, that when I am dressing as a pirate, I feel no need to wear wrinkle free trousers.)

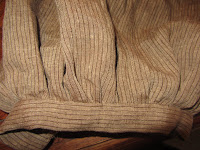
Because in the past I have been used to altering my patterns to fit, I was prepared to make some adjustments to these. However, because of the style of construction, there were no alterations necessary. I cannot recall the last time I simply sewed a pattern with the pieces as drafted. Oh the simplicity! I made two small changes in how I put things together but they required no change to the drafting. Rather than making the bottom casing a hidden affair with elastic, I left the that casing visible on the legs and ran a ribbon through each channel which I tied into a bow as a closure. (I cannot abide elastic around my joints unless it is too loose to be of any utility.) My other small change was to the side opening on the trousers. The pattern calls for a facing from the back half of the opening, ostensibly so that if there is any gap in the opening one will be modestly covered. However, I decided to bind off the front edge of the opening at the same time I did the facing.

Once the facing was in place, I faced the monumental task of gathering up the rather tent like garment into a distinct waist and legs. There were shenanigans involving Mr. Monte, the super dog, and even a feline assistant or two. There were also long stretches of Dr. Who while I diligently applied needle and thread to the task of gathering up the fabric. In truth, pinning the gathers so that the fabric was even across the waist and leg bands was rather time consuming, but all in and all, I felt it came out nicely. (And Monte, while he clearly questioned my sanity, was wonderfully patient as a model.)

The remaining steps flew by in a matter of moments at the sewing machine. Though I broke the work up across several days, I know that I could make these trousers again over the course of a single day. Quick, comfortable, and, I think, delightfully piratical, these trousers are a pleasure to wear. My only concern--a minor one born of my own old-fashioned style--is that the fabric is rather more sheer than I realized. Were I to make them again out of a similar fabric, I might try flat lining them. For now, I am throwing caution to the wind. I can't quite imagine a pirate wearing a slip under her trousers.

~La Cucitrice

A Costume's Progress: Steampunk Pirate

Gentle readers,

I have been working on a rather large costume project the last few weeks and I promise to start posting about that work. However, I thought I should give the background and inspiration for said project. As you might have noticed, I have in the past been more than a little friendly with the world of Renaissance Faires. I also have a rather extreme fondness* for hats. In the insular world of the Renaissance Faire, those of the piratical persuasion often have the most fabulous hats. Imagine my glee, then, when I heard that the local steampunk community was holding a pirate parade! I could combine my fondness for hats, my appreciation for the more flamboyant piratical-wear, and my current interest in the Steampunk community. And that, my dears, is precisely what I have been working on these last several weeks.

My dear auntie gave me a fabulous pattern set from Laughing Moon Mercantile for Christmas. The sporting jacket which I shared recently came from this set of patterns. In that package was also the delightfully named and intriguing Turkish trousers. My auntie encouraged me to make up these trousers right away and so with the pirate costume in mind, I dove right into Turkish Trouser Madness. They were quite fun to make, and I think they will be splendid to wear! (I shall write about these trousers very soon. )

The costume also requires, in my mind at least, an appropriate vest or, in this case, corset. I have been madly working away on the mock-up and intend to start the actual garment this week. There are plans within plans for this pattern which my other dear auntie on the west coast gave me. I am entirely inspired by the gold work embroidery of the Balkans and of North Africa and have decided on this basis alone that my pirate costume will be something of a re-imagined Ottoman Empire bandit. Certainly in the Balkans, bandits were rather revered as rebels in direct opposition to the Ottoman rulers. They were romanticized, balladized, and probably a number of other things which are much less charming to discuss.

This Ottoman influence led me by various pathways toward Zouaves and Zouave Vivandieres. So while I am working on the corset vest, I will also be creating my take on the hat I see in many old photos of Zouaves. Oh, I could just make a fez--and believe me I have thought about it!--but I am curious to try something a little different. (After all, I can always make a fez, too. Just for fun. Because fezes are awesome. ) When discussing any kind of piratical attire, one must take careful consideration of the hat*.

Once the pants, vest and hat are complete, I will move onto the less pressing but none the less fun garments: spats, a shirt, and a piratical sash. One simply must have a sash! I have one or two sashes that might suffice but I'm rather in the mood to make one that will coordinate with the ensemble. The spats will come from the same set of patterns that I've used for the trousers and sporting jacket. In our Tucson climate, the spats will provide the advantage of a saucy look without the warmth of boots. Of course, the top is the least critical item of the whole list and so that shall wait for the end. If time permits, I may put together a sheath for my wooden Tai Chi saber so that I may be piratical while swashing my buckle. Or is that buckling my swash?

~La Cucitrice

*I'm sure I can stop wearing hats any time that I want to but why ever would I want to stop wearing hats?!

Friday, January 27, 2012

Victorian Sporting Jacket: A little something comfortable


Early in December, I was struck by the desire to make up a jacket or basque to go with this beautiful walking skirt I had been planning. I had the most luscious olive green wool for the skirt and I had been sitting on it, figuratively speaking, until the time was right to make it up. After a bit of a crusade and questioning my friends for advice, I finally found some rather bold plaid fabric that I thought would work.

My initial plan was to make up a sleeved version of a vest I had made last spring. I love this pattern and found it so easy to work with in the past. However, I was a little intimidated by the sleeves. I thought they might be a bit too much for a person of my size and stature. I found myself waffling on how to alter the sleeves and make them less, well, poofy. I moved onto other projects, namely a vest for my husband, and decided to wait on the jacket and skirt once more.

Then one of my aunties surprised me with a fabulous pattern for Christmas. It's part of the Laughing Moon line of historical recreation patterns, and I was immediately eager to make it up. I made my corset last spring from one of the Laughing Moon patterns so I knew that the size would need some adjusting but that it would go together beautifully and that the instructions would be both marvelously complete and informative. Once New Year's day had passed and things settled around the house, I dove into my project.

I knew right away that I didn't have quite enough of the plaid fabric to fill out all of the basque so I decided to track down a little coordinating fabric for the collar. I trotted off to dear old SAS fabrics where I thought I might be able to find something cheap but good for the project. I then ransacked my stash of scraps and fabric to see if I could find something suitable for lining. Since I had committed to the 2012 Fabric De-Stash Challenge, I wanted to use up a good bit of things on hand. I happened to have a lovely dark green rayon-poly blend that I thought would do nicely for the lining and picked up this rather odd shade of gray-green corduroy at SAS.

I washed everything, did some ironing and got ready to cut into my fabric. (Last year's massive Victorian sewing project explosion taught me that pre-shrinking and ironing are not to be skipped.) I have a few tricks now for cutting out my fabric but it still tends to be one of the most time intensive parts of any project for me. I think, partly because I find it so boring, it just seems to take longer than everything else. I measured myself carefully and tried to adjust the pieces appropriately; however, I found later that I still made the jacket a bit too large over all.

Both the corduroy and the plaid fabric were a dream to work with. The plaid was 100% cotton and had a very nice hand. The corduroy, well, it's anyone's guess what the fabric content was for that fabric, but it had good body and cut out very nicely. The lining fabric was, frankly, something of a disaster. As I cut, I did not realize that it was slipping and sliding ever so slightly. When I matched it up to flat-line the body of the basque, these little errors were easily adjusted. Mostly they showed in an uneven length for the lining. The collar lining, however, was another story entirely. I'm still not sure how I got everything to match up for a decent finish. I'm glad to say that I used up all of that green fabric and will never, ever have to sew with it again.
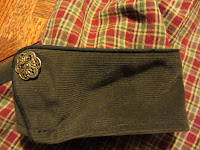
One of my favorite elements of the jacket or basque, as it was properly called, was the back pleats. I thought they were quite stylish and gave it that 19th Century sporty feel. When I was looking at the pattern originally, I thought the pleats might prove the most challenging element of the jacket construction, but I was entirely wrong. They went together splendidly. A little tailor's chalk, a little ironing, a few basting stitches and voila, beautiful pleats! They held up very nicely during wear, as well.

In order to make my fabric stretch, I decided to not only make the collar out of the pretty corduroy but also the side panels. I thought that might give a slightly steamy feel to an otherwise very traditional approach to the basque. I outlined the contrasting panels in black piping to give it a sharper contrast and a bit of a military uniform flair. Once all of the bodice pieces were sewn together, I attached the dreaded collar. Fortunately, after all the trouble of sewing the lining and outer fabric together, the collar attached very nicely to the bodice. I did find that I had to adjust the pining a few times to get everything symmetrical, but in general, the bodice and collar went together very quickly.

Now that I had only the sleeves, hem and fastenings remaining, I did a quick test to see how the basque fit. I was pleased to note that it went on like a dream and hung very well. However, I was unsure if I had made it too large--oh, I had!--or if it would snug up a bit better once I had fastenings in place. I did take in a bit at the armscye as things tend to be too big across my shoulders as a general rule. I had the strange gap that I often get from bust to armscye but I opted not to put a dart in because I was suddenly worried about historicity. (I think I briefly lost my mind or was somehow possessed by the History fairies.)

At last I started putting together the sleeves. They were rather different than anything I had put together before as they had a forward curve drafted into the pattern. I thought that might be awkward to wear but I did not change the pattern. I was very careful, however, to make sure that I had my forward curve actually going forward when I set the sleeve into the armscye. I decided to add military inspired cuffs to the sleeves before I set them in. I used the same corduroy and black piping. Having never added cuffs to anything before, I sort of re-invented the process for myself. They turned out rather nice for a first time venture. Setting the sleeves into the armscye went very smoothly. I did my gathering stitches by hand which can be tedious sewing, but I have found easing quicker that way. There was a lot to ease so I wanted it to happen as painlessly as possible.

Rather than the traditional hem the pattern called for, I used some black double fold bias tape to bind off the bottom edge. I thought it would pick up the black piping and continue with the military feel. Once that was done, a rather quick process, I had the tedium of attaching the fasteners. The pattern called for hooks and eyes and I was happy to comply as I assumed it would be rather less tricky than lining up button holes and buttons for a double breasted jacket. However, I found this to be the least satisfactory part of the process. The only guidance for the hook and eye placement was to use as many as would make the jacket secure. I used quite a few but ultimately not enough when it came time to wear the jacket. I immediately planned to re-visit the question of fasteners in the near future.

The basque pattern had a self-belt which I cut out and prepared in the corduroy fabric. However, I had an opportunity to wear the basque in public before I finished the belt. Like the fasteners, I planned to consider the belt and buckle in the future. Since I intended to change the front fasteners, I decided it was best to wait to complete the belt until that problem was solved. I wanted them to be thematically in keeping with each other.

All in all, the basque was wonderful to wear. I found it quite comfortable, and since it did not require a corset, I simply wore a tank top underneath and used a wide leather belt to help secure the closures. The Saturday I debuted the jacket was rather warm for a Tucson January so I found myself very glad of the absence of layers and the cotton fabric. It provided several hours of comfort while walking, talking, and in general moving as a modern woman. I thought it looked rather nice, too. I shall be looking forward to adjusting those fasteners and wearing it in the future. (I would love any advice on the fastenings, by the by. There is nothing quite so helpful as additional, fresh eyes.)

~La Cucitrice